Friday, September 25, 2015

Knock Down Sawhorse Storage

A few years back I made a knock down sawhorse set.  It has been really useful, but I just had it propped up against the wall in my garage.  Not optimal.

Over the last week or so, I created a bunch of hanging cleats to store the parts.  I did it completely with scraps of plywood and 2x4 material I had in my garage.

For the sawhorse legs, I created two hanging braces with some plywood stops that allow me to hang two legs on each brace.

For the sawhorse stretchers, I created horizontal brace with some 2x4 material cut lengthwise.  It lets me slip those two stretchers in and keeps everything in place.

For the grid stretchers, I created a couple of U shaped braces hung on the wall where the stretchers can be slipped into.

This picture explains it easier than the words can.


Bonus storage.  After I completed the sawhorse grid storage, I had a bunch of blank wall space that I wanted to be able to hang cords, tools, and the like.  I had some left over peg board from the storage cabinet, so I made a 4 foot by 28 inch panel.  It is that size because I can make two of them.

I ripped down some 3/4" ply into 2" strips and used Kreg screws to make a frame then mounted it to the wall.


To show the usefulness I hung some of my gear onto it including a few things that I used to just have propped in the corner.


Sunday, January 5, 2014

Mobile Workbench Build

I have a storage bench in my garage. It is supposed to be a workbench - but it ends up being a staging/storage place instead.

Since I know I need that kind of space, it was time to find something more useful as an actual workbench.  While browsing reddit.com, a user called kurtz61 did his version and pointed me at the instructions on One Project Closer.

I decided on a few modifications before I went to the big box store. First I am not doing the reinforcing steel bar, instead I went with a torsion box for the top. Second, I shorted the bench to six foot from eight foot.  This fits my garage a little better and gives me some correctly sized plywood to build a rolling cart or two for smaller tools such as my table saw or router table. Third, I used 2" casters. Total load is over 400 lbs and that should be plenty for this bench.

Off to the Big Box.  I picked up a sheet of 3/4" AC sanded plywood, a sheet of 3/8" AC sanded plywood, seven 2x4s, eight Simpson ridge tie connectors, a box of 1 1/4" wood screws, four 2" casters, and a tube of construction adhesive.

While there, I had them rip the two sheets of plywood to 2' width. They will do one cut for free and will do a much better job than I can do with a circular saw.

I followed the cut list for the 2x4s from One Project Closer - except that I made the overall length six foot.  I then cut off 24" from my 3/4 plywood sheets and one of the 3/8" sheets.

Here is all of the 2x4s dimensioned.


Next up was to build the top frame. I used the Simpson ridge ties with a scrap 2x4 as a leg to layout the stretchers and end cap pieces.


I then installed the legs and a middle stretcher for additional support.

Next up was the bottom of the torsion box.  I used my jig saw and notched the corners of a piece of 3/8" plywood.  Then using construction adhesive and screws, I attached it to the underside of the top.

This is what it looks like flipped back upright.


Then I used more glue and screws, I attached the 3/4" plywood top.  I made sure to just countersink the screw heads so they will not snag on any projects I will work on.

I then used some scrap 2x4s to line up the structure for the bottom shelf and attached some more Simpson ties.


Once the shelf support was built, I added two caster supports.  The casters won't attach well to the end grain of the legs, so this gives them something to solidly screw into.

Then I installed the four casters.


After I flipped the unit onto it's wheels it was time to fit the bottom shelf. I used 3/4" plywood and just like the base of the torsion box, I notched the corners.  It was attached with more construction adhesive and screws.

The mobile work bench is complete!  I jumped up on it as a test and it didn't move at all.


The left over plywood and 2x4s will be used to build a mobile table saw stand that lines up with this bench. I may also build a mobile router table stand for my router table project.

Tuesday, December 24, 2013

Garage and Shed Wall Storage

So, this is not a specific wood working project - and more of a DIY project - but it helps me move forward in getting my garage shop cleaned up and functional.

I bought a ProSlat Slatwall Organizer from woot.com a few weeks back and my dad assisted with the install.

We broke it into two parts - followed the directions for a smaller install in my garage to hang my ladders on. The main change is we used only two slats rather then the full number.  This is the results:


Works well, definitely better than the plywood and lag-screw style hangers I had before.

Last summer I installed a Rubber Maid resin shed in my back yard. These sheds have built in pockets and U shaped hangers that allow folks to hang peg-board or other systems. Unfortunately, Slatwall is frame-less. So I had to improvise with material I had around the house.  I had some 4" pine stock left over from a couple of projects ago, so I figured out that if I built a 33" high by 48" wide frame I could have 6 slat sections. The height was dictated by the location of the built in hanging pockets Rubber Maid provided.


Time to cut some lumber to size. I made two 48" long and three 26 1/4" long pieces.


Next up was joinery. I have a Kreg pocket hole jig and screws - and to me, this is the easiest, fastest way to build this frame.


I needed to attach the hangers via some bolts, so I did a little extra layout to make sure the bolt heads line up in a channel of the ProSlat.


After the hangers were attached, I hung the frame in the shed.  The stock I used was a little warped; so it doesn't hang flat - but it will do everything I need it to do. You can see the first piece of the ProSlat installed below.


I then followed the installation instructions and installed the six slats and top trim.  A couple of hooks later and we are looking pretty good.


Next time Woot has a hanger kit, I will probably pick one up. The single hooks are OK- but some better hooks will make the organization much easier.

Part of doing the project required me to clear out more space in my garage. I bought materials to build a workbench, so expect pictures from that project soon.

Sunday, February 17, 2013

Router Table - Part 4

This is the final part of my router table setup. All of the wood parts are in place, and now it is time to mount a router.  See Part 1, Part 2, and Part 3 to catch up.

First step is router selection. My shop router is a Sears Craftsman combo kit (fixed and plunge bases) and it is perfectly functional. But I did not want to have to swap out router bases whenever I wanted to swap projects. This means I need a dedicated router for this table.  I spent a bunch of time researching and finially decided on a Bosch 2-1/4 HP Variable-Speed Router. With Amazon Prime, I got it delivered in two days.

This particular router is setup to handle being mounted in a cabinet and the adjustment knob can be adjusted from the underside with a small wrench (included).

First step was drill four holes in my router table-top. This will allow me to use the included machine screws to attach the router to the top.

From Router Table

Note the adjustment hole has not been drilled. My cordness ran out of juice before I could drill that one.

Next up I did the test fit of the base. It will have to be removed because I have to drill that adjustment hole.

From Router Table

Here is a top view showing the recessed machine screws. The pencil circle is where the adjustment hole will go.

From Router Table

After my drill's batteries charged, I could drill that final hole and permanent mount the router base.

From Router Table

This is how I will make fine adjustments from the table top.

From Router Table

Here is the router in the base with a straight cutting bit installed.

From Router Table

And here is my first test pass.  That is just a scrap piece of pine I had in the garage, but I am pleased with how well it worked.

From Router Table
There are only a couple of adjustments I am going to make and none are required. For one - I am going to add a couple of handles to the cabinet base. It is tricky to move around  as it sits.  I am also going to figure out the power. Either by installing a switch that controls both the router and a vacume or by figuring out how to route the power cable out the side or back of the cabinet.

I hope these posts have been helpful and gives some ideas to others looking to build a router table for themselves.

Wednesday, December 26, 2012

Router Table - Part 3


In Part 1 and Part 2 I built most the cabinet and most of the top. I have now completed the top, attached it, and built the fence.

First up was test fitting the top.  It had to fit over the base cabinet with no real rubbing and be tight enough of a tolerance to handle the piano hinge used to attach it.
From Router Table

Once I knew the top would work, I did the layout for two slots that the fence bolts would ride in.  Here is the layout lines.

From Router Table

I used the plunge action of my router to gouge out the two slots. It took a couple of passes, but I ended up with two working guide slots.


From Router Table

Just to make sure, I test fit the star knobs and bolts I am going to use to attach the fence.


From Router Table

Now that I had the guide slots in place, I was able to put in the extra top pieces that will make sure the top fits and that the fence will work. Here are two additional braces along with the guide blocks that the fence will use to make sure it is in the guide slots.


From Router Table

I used a piano hinge to attach the top to the cabinet.
From Router Table

From Router Table

Next up is the fence. First step was to glue up two 1/2" plywood sections together.
From Router Table

Once dry, I started to notch out where the clearance for the router bits.

From Router Table

Then I glued a base plate and a couple of gussets to make a complete fence. Once it was dry, I made sure it worked on the cabinet.
From Router Table

Outside of mounting a fixed based router - that pretty much completes the project. Here are the final pictures of the cabinet ready for that router.
From Router Table

From Router Table

There are a couple of things I may add. Once is some sort of vacuum attachment to the fence to keep the sawdust from binding up things. The other is a single power switch that can control both the router and the vacuum. I have one from a cheap metal router table I have that I will probably figure out a mounting solution for.

Final Parts List:
ItemSourceCost
Birch PlywoodFine Lumber and Plywood$35
Panel NailsHome Depot$3 for a 6oz box
Gorilla Wood GlueHome Depot$4 for a 8oz bottle
5 Star Thru Hole Knobs (x2)Woodcraft$3 for two
1/4" x 2" Carriage BoltHome Depot$0.17
1/4" Cut Washers (x2)Home Depot$0.22 for two
1/4" Lock NutHome Depot$0.10
5/16" Carriage Bolts (x2)Home Depot$0.48 for two
5/16" Cut Washers (x4)Home Depot$0.48 for four
24" Stainless Steel Piano HingeAmazon.com$14.35

Final Total Cost: $60.80

Sunday, November 11, 2012

Router Table - Part 2

In Part 1, I built most of the cabinet. Here I complete the cabinet and build the actual table top.

The first thing I needed to do was fit the front panels that face the very front of the cabinet. In order to do that I needed to do a bit of trimming of the shelves then affix the two vertical pieces. Here is a picture of the completed face frame. While I was at it, I cut a hole in the face of the drawer to use as a pull.

From Router Table

In the plans, there is a side brace that is used to hold the top in place when tilted up to make it easier to work on the router. It uses a simple carriage bolt and lock nut to hold it in place.
From Router Table

I could then put away the cabinet base and focus on the top. The first stop was attaching the outer frame. I glued the front and back of the outer frame in place and clamped it up. Because I am using 1/2" plywood, my 1" panel nails would poke through, so I am relying just on the glue.
From Router Table

I still have to do the sides of the outer frame and then the inner frame along with the center router hole and some guides for the fence, but the top is getting there.
Parts List So Far:
ItemSourceCost
Birch PlywoodFine Lumber and Plywood$35
Panel NailsHome Depot$3 for a 6oz box
Gorilla Wood GlueHome Depot$4 for a 8oz bottle
5 Star Thru Hole Knobs (x2)Woodcraft$3 for two
1/4" x 2" Carriage BoltHome Depot$0.17
1/4" Cut Washers (x2)Home Depot$0.22 for two
1/4" Lock NutHome Depot$0.??
5/16" Carriage Bolts (x2)Home Depot$0.48 for two
5/16" Cut Washers (x4)Home Depot$0.48 for four

Saturday, November 10, 2012

Knock Down Cutting Grid with Sawhorses

Note: I originally posted this in July 2011 on another blog - I moved it here because I am putting all my garage and woodworking projects in one place.

When I was building the Garage Cabinet (which I am still happy with), I realized I needed a method to cut down large stock like plywood without using the bed of my pickup.

Awhile back I ran across this page which had some renderings and pictures of exactly what I wanted to do. It referenced two other pages (here and here) with some extra details.

The plan was to build two sawhorses that could come apart for storage and portability along with a wood grid that could hold a 4'x8' sheet of plywood while it was being cut with a circular saw.

In the cabinet build I came across a deal at Home Depot where a sheet of 3/4" A/C plywood was $24. How can you pass that up? I picked up another sheet- which is all I would need for this project.

What is A/C plywood? One side is rated "A" grade which is the top grade without knots or defects while the other side is "C" grade which will have knots and filled in defects. This is for sawhorses- any grade would be fine but these sheets are solid and straight and cheep- so that is what I used.

Side One:


Side Two:


My cutting guide and list. It is basically all 4" strips of plywood.


I didn't do much in the way of plans this time. I am using the two detailed diagrams from the Wood Working Tips side linked above.

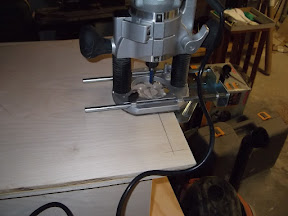
The first part was to cut all the strips. I set up the guide on my circular saw and went to town. The result is a lot of long thin plywood strips.


I then sized all of the pieces needed for the sawhorse legs. The legs are 35" long, the long braces are 21", and the short braces are 11".


Once that was out of the way, I set-up my chop saw to do a 15 degree cut. I put a stop block in a jig because basically every piece needed to be chopped at the end to 15 degrees.


Then it is time for some assembly. Gorilla glue and 1 1/4" screws all around. You will note that there is a vertical piece of scrap at the top. That is a spacer to ensure the stretcher will fit later on.


And the first sawhorse leg is done.


Repeat the same process three more times, and now we have four sawhorse legs.


Then I made up some 2"x4" cleats and attached them to the stretchers. This is what it looks like with the stretcher in place.


I repeated the process on the second stretcher and now I have two completed knock down sawhorses.


After I had an interview this morning, (it went very well, thank you for asking) I got cracking on the grid. The grid consists of two 8' long rails, two 4' long stretchers and the two saw horse stretchers made earlier. They will fit together with notches creating half-lap joints.

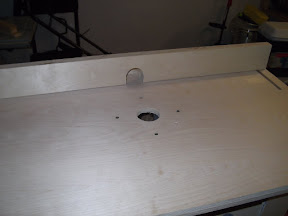
Here is the first of the sawhorse stretchers with the notch cut out and some layout marks for notches in one of the grid stretchers.


One I had cut the sawhorse and grid stretchers I realized I could make a small grid if I didn't need to use the whole thing. Nice.


Here is the full size grid all put together.


This grid is sturdy and large enough to hold basically any plywood or normal stock that I would come across. Given a sheet of plywood, this could also work as the frame for a portable workbench as well.

It fully collapses and can get pushed right up on the wall of my garage. I will probably figure out some way to hang it off the floor as well- but not today. Today I take a drink of cool water and enjoy my handy work. Then I get the broom and clean up...